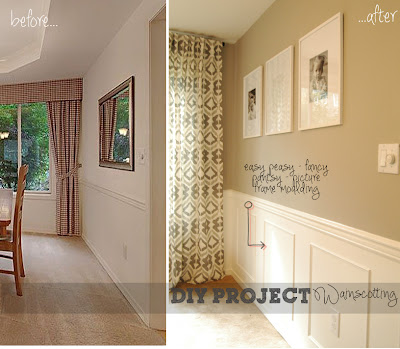
I’ve always loved Wainscoting. It looks so classic, clean and just plain fancy pantsy…so when we bought our house I was so so so excited that the living room and dinning room had a chair rail. I just knew picture frame boxes would be such a great completion to the chair rail.
In theory my plan was slightly backwards… normally one would apply wainscoting board first for a smooth surface, then apply the chair rail and picture frame molding, but seeing that the walls were minimally textured…I said “what the heck” this is {DIY}. The slight imperfection was not worth the time and money to re-do the chair rail.
So here are some BEFORE/AFTER shots of the Project. Really the craftsmanship on the chair rail was excellent and the walls themself were incredibly even – so I knew the molding project would be super simple.

As you can see the change is drastic and really makes the room POP. Also helping the room “POP” is the color – crisp snowfall white in semigloss (Benjamin Moore) that is on the lower portion of the walls. The previous owners had the lower portion cream in the dinning room and mint green in the living room….What the Heck? But i shouldn’t judge…to each his own.

For creation of Picture Frame Boxes – what you need
- A partner in crime – Again mad props to my dad! The project is hard to do all by yourself!!! Plus he just knows a about DIY!
- A Plan – Seriously map out the room. I had a general idea of what I wanted. 3″ up from baseboard and 3″ down from the chair rail and then i wanted each box approximately 4″‘s apart and about 18″‘s wide.
- Picture Frame Molding – I found mine at Home Depot it is 3/4 of an inch thick. I got real wood vs MDF (more expensive but better quality)
- Zinnser Primer – I suggest priming the molding before you nail them in
- {Power Grip}– to adhere molding to wall before you nail it. Home depot in Caulking section
- Pneumatic Brad Nailer & Nails – or a powerful nailgun
- Miter Saw – or saw that allows for angle cuts on a 45 degree angle
- {Framing Square} – to make sure your boxes are square!
- A level
- A rag to wipe up excess power grip glue as needed
For finishes on Picture Frame Boxes – What you need
- Paint-able caulk and a quality caulking gun – all from home depot
- {These caulking tools} – LOVE THEM!
- A Nail set & hammer – to pound in nail heads so they are under the level of wood
- Light weight wall putty– to fill in nail holes after they have been set
- Your PAINT!
We made a plan and stuck to it making sure to measure exactly the same each time and if the measurements didn’t fit the portion of wall…audible on the width of the box…just keep the spacing of each box the same. Here is a shot of my first steps. I literally mapped out the molding with painters tape because we had so many windows and wall all with varying sizes. If an 18″ wide box didn’t fit i measured the wall and took 4″ off from each side (ie…the wall is 20″, less 4″ on right and 4″ on left box is now 12″ wide).
Here is the perfect example of what I mean. The wall is smaller then 18 inches and the right side wall has a window. So you really just have to play around with the look until you get what works best for you! That’s why i loved the painters tape, it helped me visually and on calculating how much wood I needed to buy.
Once you are ready to go with your plan, mark your boxes on the walls with chalk or pencil and take down the tape. Take your primed moulding and cut the wood to appropriate lengths with a 45 degree angle on appropriate side. (We pre-cut all the wood and laid everything out so we got a really good rhythm going.) Then start building your box. We worked out way counter clockwise from the top, to left side, and then did the right side and bottom at the same time to make sure things were square.
So add a little power grip glue to each piece before securing to wall, double check it’s level and nail. Get out the framing square, make sure left piece is square and level and nail. Then do the bottom and left at the same time – this is where having 4 hands comes in handy. We did the bottom and right portion together because if something was not “perfect” it’s better to have the 2 sides absorb the visual defect then just one – it would be too obvious. You can just work all the way around doing each separately.
The whole project probably took about 10 hours to measure, prep wood, cut wood, nail on boxes, and add finishing touches. We did the boxes over 3 days a few hours each. Then at night when Savannah was asleep I snuck in the finishing touches a few hours at a time.

As you can see the seams are nearly invisible, that is from setting my nails and filling them with lightweight wall putty. Then caulking all around the outer and inner edges, making sure to use my handy caulking tool for smooth lines. I used a semigloss finish, bottom color is snowfall white from Benjamin Moore. Top Color is Thunder from Benjamin Moore.
Enjoy!
